Why Your Website’s Speed Depends on Image Optimization
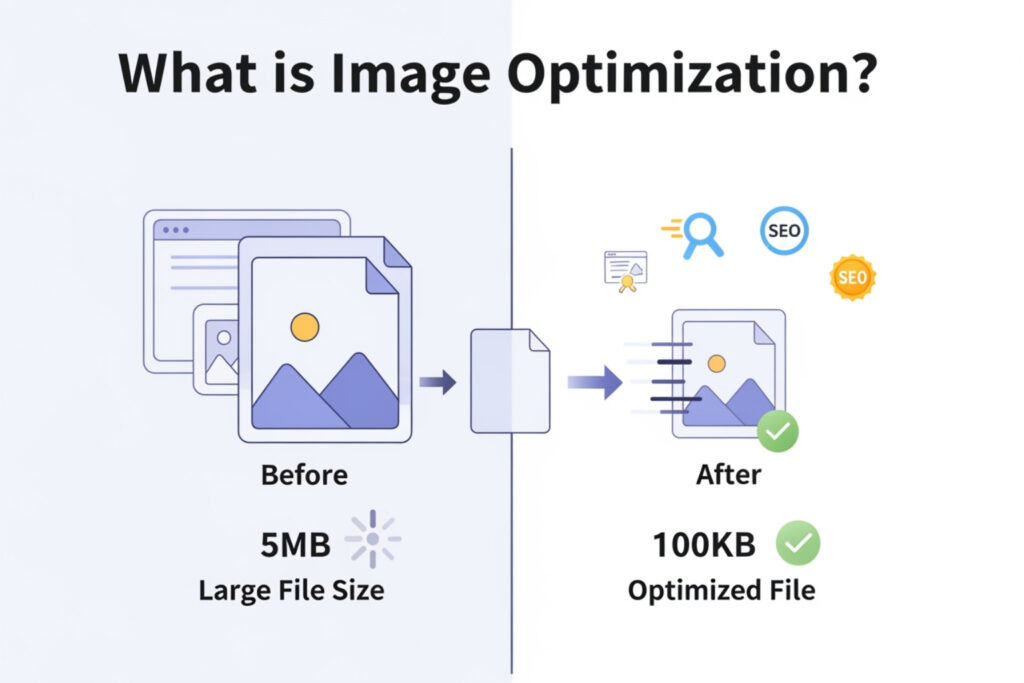
What is image optimization? It’s a set of techniques designed to reduce image file sizes without compromising the quality your visitors see—making your images load faster and your website perform better.
Here’s what image optimization includes:
- Compression: Reducing file size by removing unnecessary data while maintaining visual quality
- Resizing: Scaling images to match their actual display dimensions on your site
- Format Selection: Choosing the right file type (JPEG, PNG, WebP, AVIF, SVG) for each use case
- Delivery Optimization: Using techniques like lazy loading and CDNs to serve images efficiently
- SEO Enhancement: Optimizing filenames, alt tags, and metadata to help search engines understand your images
If you’ve ever watched a website slowly load image after image, you’ve experienced the frustration of unoptimized images firsthand. Research shows that 53% of mobile users abandon a site if it takes longer than 3 seconds to load. Even worse, images often account for nearly half of a page’s total weight, making them a critical factor affecting your site’s speed.
This matters more than ever because Google now uses mobile-first indexing and Core Web Vitals as ranking factors. Your images directly impact metrics like Largest Contentful Paint (LCP)—which should occur within 2.5 seconds for a good user experience. When your images are too large or poorly formatted, they drag down your entire site’s performance.
The good news? Image optimization can reduce file sizes by 66% or more without visible quality loss. A 2.5MB unoptimized image can become a crisp 68KB optimized version that loads almost instantly. That’s the difference between losing a potential customer and keeping them engaged.
I’m Jeff Pratt, owner of JPG Designs, and for over 15 years I’ve helped hundreds of businesses transform their website performance through strategic image optimization and technical SEO. Understanding what is image optimization and implementing it correctly has consistently delivered faster load times, better Google rankings, and improved conversion rates for our clients.

Relevant articles related to What is image optimization?:
What is Image Optimization and Why Does it Matter?
At its core, What is image optimization? refers to the process of modifying and delivering high-quality images in the optimal format, dimension, and resolution for the device accessing them. The goal is to keep the smallest possible file size that will not result in noticeable image degradation.
Think of it like packing a suitcase. If you throw your clothes in haphazardly, the suitcase is heavy, bulging, and hard to carry. If you fold everything neatly (compression) and only pack what you need (resizing), the suitcase is light and easy to move. In the digital world, “moving” that suitcase is the process of a browser downloading your website’s data.
Unoptimized images are a major “site-speed killer.” When a user visits your site, their browser has to download every byte of data. Since images account for a significant portion of the downloaded bytes on a page—with formats like JPEG, PNG, and WebP making up the vast majority of image traffic—they are usually the primary culprit behind slow load times.
In fact, unoptimized images can contribute to a significant portion of a page’s weight. When we talk about ways to speed up your website, image optimization is often the “low-hanging fruit” that yields the biggest performance gains.

The Benefits of Image Optimization:
- Improved User Experience (UX): No one likes waiting for a “shutter effect” where images load piece by piece. Fast images keep users engaged.
- Better SEO Rankings: Google uses page speed as a ranking factor. Faster sites get a “thumbs up” in search results.
- Higher Conversion Rates: A faster site means fewer frustrated users and more completed sales or inquiries.
- Reduced Bandwidth Costs: Smaller files mean less data transferred, which can save money on hosting and help users on limited data plans.
- Enhanced Mobile Performance: Mobile devices often have less processing power and slower connections than desktops. Optimization is critical for the mobile-first era.
Understanding Lossy vs. Lossless Image Optimization
When we dive into the technical side of What is image optimization?, we encounter two main types of compression: lossy and lossless.
Lossy Compression Lossy compression works by removing some of the data from the image file. It uses clever algorithms like the Discrete Cosine Transform (DCT) to discard information that the human eye is less likely to notice. This results in a massive reduction in file size.
- Pros: Can achieve 10x larger compression ratios than other methods; significantly smaller files.
- Cons: Quality degrades if you over-compress; the data is permanently removed.
- Best For: General website photos, blog images, and e-commerce product shots.
Lossless Compression Lossless compression reduces file size by reorganizing the image data more efficiently without removing any actual pixels.
- Pros: No quality loss; you can revert to the original image perfectly.
- Cons: File sizes remain much larger than lossy versions.
- Best For: Logos, simple illustrations, and digital photography portfolios where every pixel counts.
Learn more about lossy compression here.
| Feature | Lossy Compression | Lossless Compression |
|---|---|---|
| Data Removal | Discards “unnecessary” data | Keeps all original data |
| Quality | Slight degradation (often invisible) | Identical to original |
| File Size | Very Small | Medium/Large |
| Best Use Case | Photographs, complex images | Logos, icons, text-heavy graphics |
| Common Formats | JPEG, WebP | PNG, GIF, SVG |
Choosing the Right File Formats for Web Performance
Selecting the right “container” for your image is half the battle. We generally categorize web images into two groups: Raster and Vector.
- Raster Images: These are made of a fixed grid of pixels (like a mosaic). When you blow them up, they get blurry or “pixelated.” Examples include JPEG, PNG, and WebP.
- Vector Images: These are made of mathematical paths (lines and curves). You can scale them to the size of a billboard or shrink them to the size of a postage stamp, and they stay perfectly sharp. SVG is the king of web vectors.
The Heavy Hitters:
- JPEG: The gold standard for photos. It handles millions of colors and offers excellent lossy compression.
- PNG: Best for images that need transparency or contain text. PNG-8 is limited to 256 colors (smaller), while PNG-24 handles millions (larger).
- WebP: A modern format developed by Google that provides superior lossy and lossless compression. It’s usually 25-34% smaller than JPEGs of equivalent quality.
- AVIF: A high-performance format that offers even better compression than WebP, now widely supported by major browsers.
- SVG: The only choice for logos and icons. It’s tiny, sharp, and responsive.
When choosing, professional website photography usually requires the high-color depth of JPEG or WebP, while your company logo should almost always be an SVG.
Technical Steps for Reducing Image File Size
Ready to get your hands dirty? Here is the workflow we use to ensure images are lean and mean:
1. Resize the Dimensions This is the most common mistake we see. If your website displays an image at 800 pixels wide, do not upload a 4000-pixel wide photo from your camera. Use a tool to shrink the dimensions first. Most desktop displays are 1,920 pixels wide or smaller, so there is rarely a need for anything larger.
2. Choose the Right Compression Ratio When saving a JPEG, you can usually choose a quality level from 1 to 100. A “sweet spot” is often around 70-80. This reduces the file size significantly while keeping the image looking great to the naked eye.
3. Remove Metadata (EXIF Data) Cameras embed a lot of “hidden” info in photos: the date taken, the camera model, GPS coordinates, and more. This metadata adds weight to the file. Removing it (often called “stripping”) can save a few extra kilobytes per image.
4. Use the Right Tools You don’t need to be a Photoshop wizard. There are fantastic free tools available:
- TinyPNG: Great for quick drag-and-drop compression of PNGs and JPEGs.
- Squoosh: A powerful web app by Google that lets you compare formats and compression levels in real-time.
- ImageOptim: A favorite for Mac users to batch-optimize images.
Mastering Image SEO Optimization and Delivery
While technical optimization makes your images fast, SEO optimization makes them visible. If Google can’t “see” what’s in your image, you’re missing out on a massive source of traffic: Google Image Search.
Furthermore, image optimization plays a huge role in seo-elements-website-design-and-optimization. Search engines want to provide the best experience, and a fast-loading, well-described image is exactly what they are looking for.
Best Practices for Image SEO Optimization
To make sure your images are doing their job for your rankings, follow these rules:
- Descriptive Filenames: Don’t leave your image named
IMG_5432.jpg. Rename it to something likecustom-web-design-rhode-island.jpg. Use hyphens to separate words, as search engines read them as spaces. - Alt Attributes (Alt Text): This is the most important SEO factor for images. Alt text describes the image for visually impaired users and for search engines. Keep it descriptive, under 125 characters, and include your target keyword naturally. Follow these alt text rules for the best results.
- Structured Data: Adding schema markup (like “Product” or “Recipe”) to your pages can help your images show up as “Rich Results” in Google, complete with ratings and prices. Check out the Structured Data guide for more.
- Image Sitemaps: As per Google, an image sitemap helps it find images that might otherwise be overlooked, especially those loaded via JavaScript.
If you’re feeling overwhelmed, we have a guide on how to SEO optimize your entire site, including your media.
Leveraging CDNs and Lazy Loading for Speed
Once your images are compressed and named correctly, you need to deliver them efficiently.
Content Delivery Networks (CDNs) A CDN is a network of servers spread across the globe. When a user in Boston visits your site, the CDN serves the images from a server in Massachusetts rather than one in California. This reduces “latency” (the time it takes for data to travel) and makes your images pop up much faster.
Lazy Loading
Why load an image at the bottom of the page if the user never scrolls down there? Lazy loading tells the browser to wait until the image is about to enter the viewport before downloading it. This saves bandwidth and speeds up the initial page load. Most modern browsers support this natively by just adding loading="lazy" to your image tag.
Responsive Images (srcset)
Image optimization refers to the process of modifying and delivering high-quality images in the optimal size for the device. Using the srcset attribute in your HTML allows you to provide a list of different-sized versions of the same image. The browser then automatically picks the best one—serving a small image to a smartphone and a large one to a 4K monitor.
Conclusion: Future-Proofing Your Site with JPG Designs
Understanding What is image optimization? is no longer optional for businesses in Rhode Island and Massachusetts. As Google continues to prioritize mobile-first indexing and user experience, the speed and clarity of your visual content will directly impact your bottom line.
By following the steps in this guide—choosing the right formats, compressing your files, and implementing smart SEO practices—you can transform a sluggish website into a high-performance marketing machine. Remember:
- Keep your optimized image size under 300 KB whenever possible.
- Use SVGs for icons and WebP for photos.
- Never forget your Alt text!
At JPG Designs, we specialize in building mobile-first websites that don’t just look pretty—they perform. We handle the technical heavy lifting of image optimization, CDN integration, and Core Web Vitals so you can focus on running your business. Whether you’re deciding what’s best for your website: professional photography or stock photos, or you need a full SEO audit, we’re here to help.
Ready to make your website “fast and furious”? Let’s get to work!